Internal Administrative Management
There are 2 core functions that Internal J&J users can perform on J&J Customer Connect to manage access and accounts for other users, and manage the rules around allowing incoming orders.
User Management
Overview
The User Management section is intended for Customer Service Representatives (CSRs) and Admins supporting internal Medical Device only. This topic explains the options to search, view, create, and edit users and their attributes.
Create New User
J&J Customer Connect portal makes it easy for J&J Customer Connect Administrators to create a new user profile on behalf of a customer or Sales Representative. The Administrator is able to create a user profile directly, instead of managing a request via self-registration.
The steps to create a new user profile are:
1
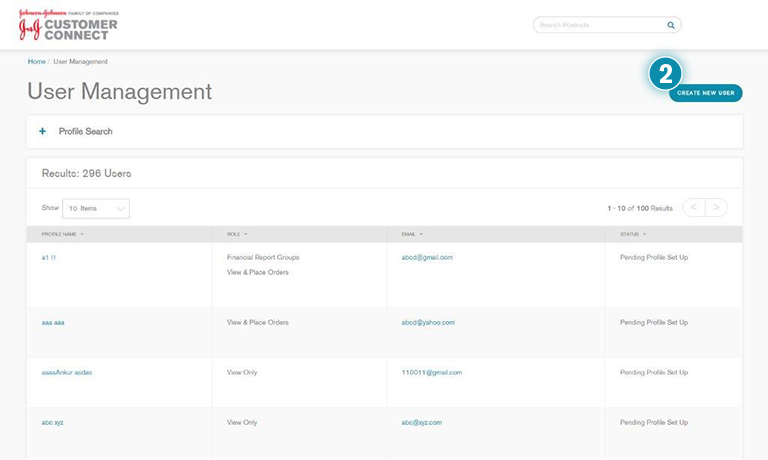
Click User Management in the Navigation pane.
2
On the User Management page, click the Create New User button.
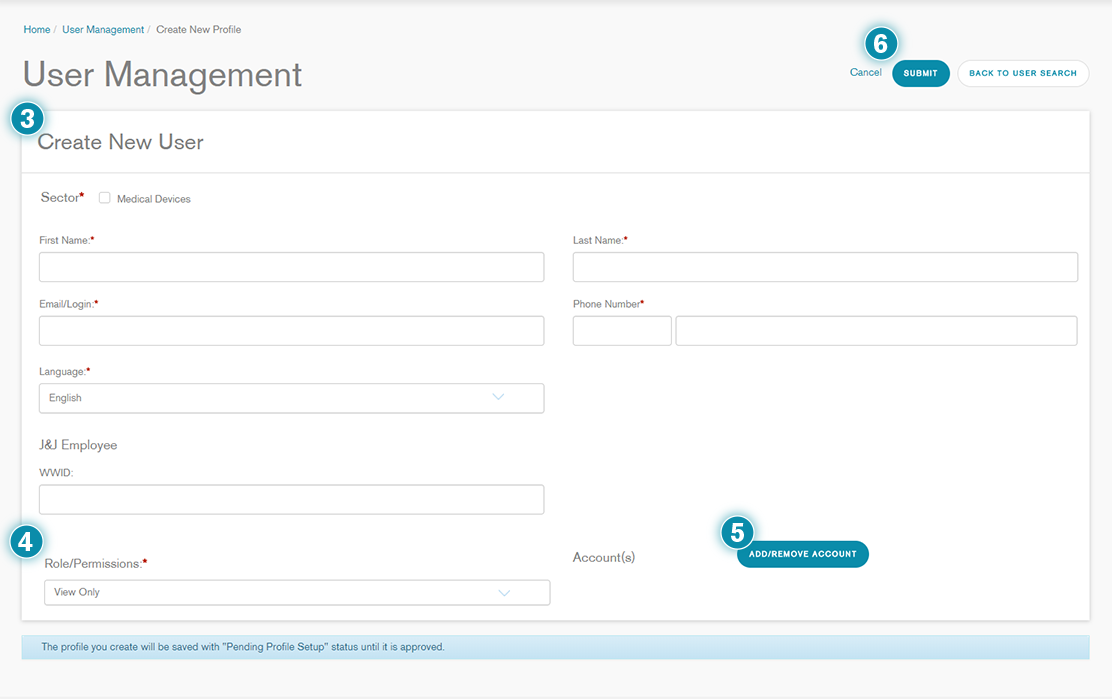
3
The
Create New User form will be displayed. Populate the required fields (marked with an asterisk) with the new user’s information, and any other known fields.
Key Tip:
While entering the phone number or mobile number, enter the country code into the smaller box, and if an area code is applicable, please enter it with the rest of the phone number into the larger box (without any spaces).
4
Select the Role/Permissions (View Only, or View & Place Orders). If access should be given to the Financial Analysis reports, that will be done separately after the user has been created. This can be done from the Edit User section.
5
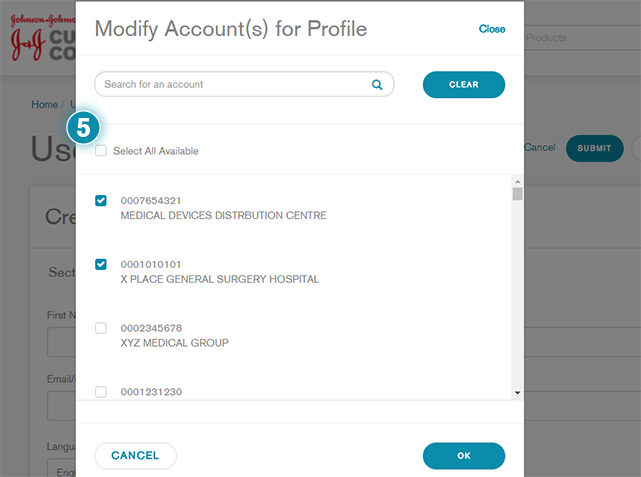
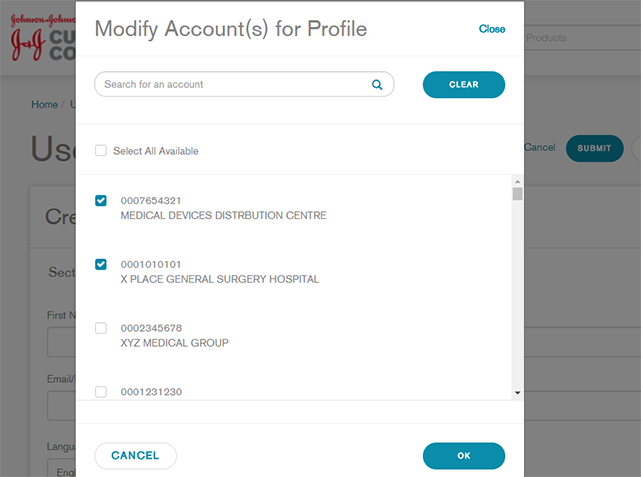
Click the Add/Remove Account button to display the Modify Account(s) for Profile pop-up. Search for and select the appropriate Account Number/Name. You can select access to multiple accounts by checking the relevant accounts, or Select All Available accounts. Click OK to proceed.
Important Information:
The following will take place based on the role selected:
-
External User View & Place Order
The supervisor will receive an email and the profile will be set to Pending Supervisor Response.
Once the supervisor confirms, the portal team will accept or reject request within 48 hours.
-
External User View Only
The portal team will receive the registration right away and the profile will be set to Pending Profile Setup.
The portal team will accept or reject requests within 48 hours.
-
All Internal Johnson & Johnson Users
The supervisor will receive an email and the profile will be set to Pending Supervisor Response.
Once the supervisor confirms, the portal team will accept or reject requests within 48 hours.
Searching Existing User Profiles
To search for an existing user profile, complete the following steps:
1
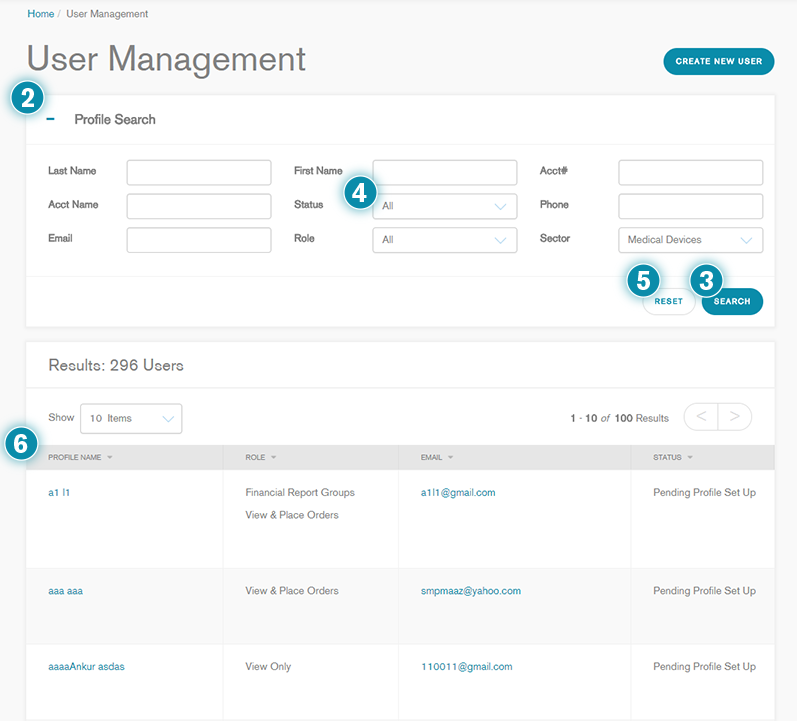
Click User Management on the portal Home page.
2
Click on the + next to Profile Search to display the search criteria. Enter the Profile Search criteria as desired, such as Last Name, Account Name, Email, etc.
3
Click Search to execute a search using the entered search criteria.
4
Sort the results using the pick-list for Status and Role. Since this portal is available only for Medical Device customers in APAC, the sector pick-list cannot be changed.
5
If needed, click Reset to clear the search results and reset the Search field values to their default.
6
Select the appropriate
Profile Name or
Email hyperlink to view the selected user profile details.
Edit Existing User Profiles
CSRs can make various changes to any existing user profile such as adding additional account numbers, changing the statuses of accounts as appropriate, etc.
A critical part of the user registration and activation process is to ensure the user identity and details are validated. This requirement is largely to protect the JJCC portal from inappropriate access, misuse and abuse. The JJCC Administrator should carefully review the data populated by the User during User Registration to ensure that the user and the user information is valid.
Important Information:
More details and rules are covered in the APAC Work Instruction CLS JJ Customer Connect (JJCC) User Administration. Please review and follow the steps outlined within that Work Instruction.
To modify existing user profiles, complete the following steps:
1
Click User Management on the portal Home page.
2
Click on the + next to Profile Search to display the search criteria.
3
Enter your desired search criteria based on the available fields such as Last Name, Account Name, Email, etc.
4
Click the Search button to display the results.
5
Select the
Profile Name hyperlink to view the Edit User section.
Important Information:
Before making any changes, review the
CSR Notes field to see if there are any special comments linked to the account that you must consider.
6
You may choose to view or edit the
Role, change the access level, or update user information. There are some additional non-compulsory fields available here that were not displayed on the
Create New User page.
Important Information:
While selecting the access level, choose “User is not a Sales representative/Broker” for external users, and “Grant access based on WWID” for internal users. “Grant access to a specific territory” is not relevant to APAC.
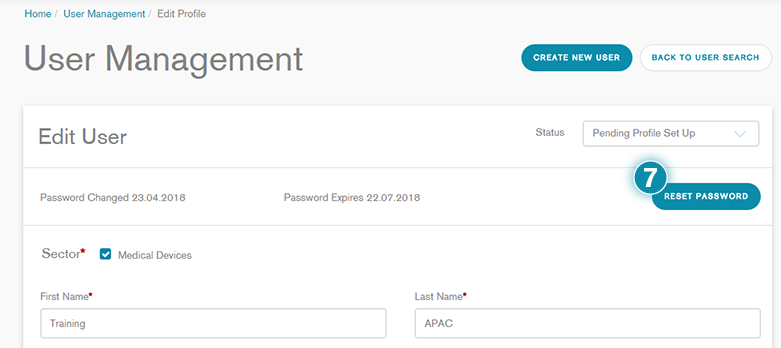
7
This page displays the dates when the password was last changed and when the set password expires as well. You may manually
Reset Password for the user from this page as well (refer to the
Manual Password Resets section of the training).
You may view or edit the Status, which includes:
-
Active
-
Disabled
-
Pending Profile Setup [This is the default status when a new profile is created. CSR must review the account before changing this status]
-
Pending Account Setup
-
Pending Supervisor Response
-
Rejected
8
Click the
Modify Account button to add additional accounts to the profile.
-
Search for and select the appropriate Account Number/Name.
-
Verify that the requested account(s) are affiliated with the person’s organization.
A user may be assigned to one or more sold-to accounts.
Important Information:
Although CSRs can make this change, a user can make this same request by logging into the J&J Customer Connect portal and selecting
My Profile – Add Accounts. Before completing this customer interaction, please inform the user how they can request this change themselves.
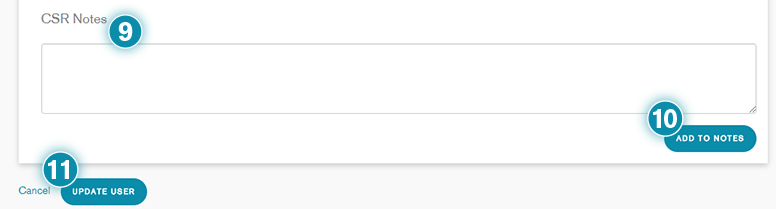
9
Update the CSR Notes field with your changes/comments. Your name and time stamp will be automatically added.
11
Click Update User.
Important Information:
A user ID will be disabled due to inactivity after 90 days.
Manual Password Resets
If someone reports that they cannot access their profile, it may have been Disabled due to password expiry (every 3 months), inactivity or exceeding 5 unsuccessful login attempts.
If this is the case, verify that they are still utilizing the email address in the profile; if they have changed businesses or emails, request that they set up a new profile.
To manually reset someone’s password, complete the following steps:
1
Click User Management on the portal Home page.
2
Click on the + next to Profile search to display the search criteria. Enter your desired search criteria based on the available fields such as Last Name, Account Name, Email, etc.
3
Click the Search button to display the results.
4
Select the Profile Name or Email hyperlink to view the Edit User section.
5
Review the CSR Notes before making any changes, to check whether someone is already working on this issue.
6
Check if they can answer at least one of their security questions, located at the bottom of their profile.
If they cannot remember one correct answer to their security questions, ask for their
email address, business phone, supervisor name or other information within their profile to verify them.
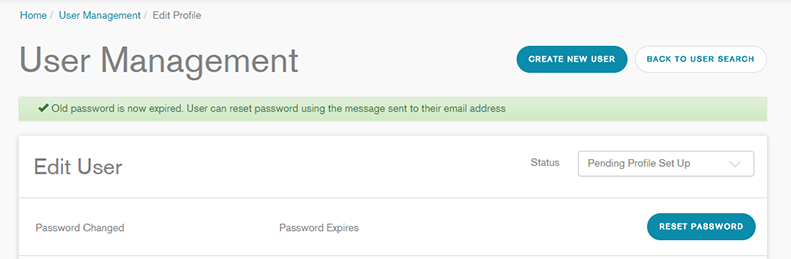
7
Change the Status to Active and click the Reset Password button.
8
A pop-up will appear notifying you that the user’s old password has now expired, and an automated email with a URL to reset their password will be sent to them.
-
If they do not receive an email, verify the email address in the profile.
-
If they need to change their email address, contact the Support team. The Support team will need to verify their information and change their email address in the back end.
9
Update the CSR Notes field with your changes/comments.Your name and time stamp will be automatically added.
Order Management
This section can used by Internal J&J Administrative users and Customer Service Representatives (CSRs) to create and manage rules to disable incoming orders.
Order Management
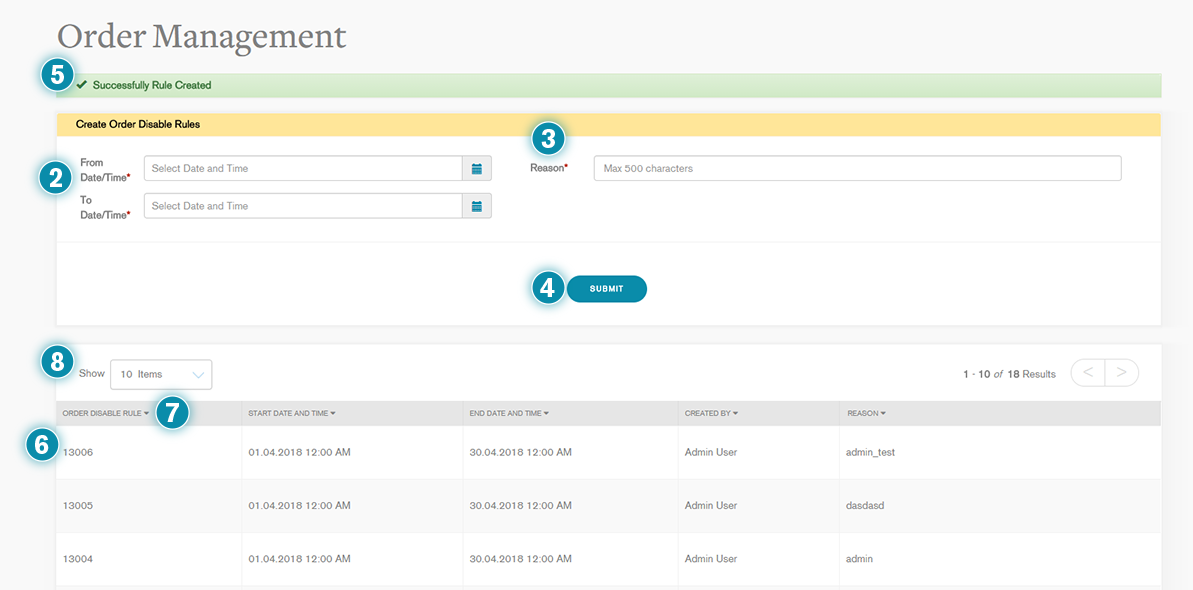
1
Click on Order Management in the navigation pane. The Order Management page will be displayed.
2
Enter the From and To dates and respective Time to indicate the period for which you would like to disable incoming orders.
Key Tip:
To select from the drop-down field, click on the Calendar icon next to the
From Date/Time field. Select the desired date. You may navigate between months and years from the forward and backward arrows. To move quickly to a date far in the future, click where the current Month is displayed, and click again for a spread of years. After selecting the date, click on the clock icon at the bottom of the drop-down to select the time. Use the arrows provided and the AM/PM switch button, to choose the time. Repeat the method in the field below to select the
To Date/Time.
Important Information:
Please note that the From and To date and time in the Order Management only, adheres to GMT time, and not local time for each country.
| Country
|
Difference from GMT
|
| New Zealand | UTC/GMT +12:00 |
| Australia | UTC/GMT +10:00
(Daylight saving UTC/GMT +11:00) |
| Korea | UTC/GMT +09:00 |
| China | UTC/GMT +08:00 |
| Taiwan | UTC/GMT +08:00 |
| Hong Kong | UTC/GMT +08:00 |
| Singapore | UTC/GMT +08:00 |
| Thailand | UTC/GMT +07:00 |
| India | UTC/GMT +05:30 |
3
Enter the Reason for creating this rule to disable orders for the selected period. You may type a maximum of 500 characters in the Reason field.
4
Click Submit to create the rule.
5
You will receive a message confirming that your rule has been created successfully.
6
You will be able to view your new rule in the first row of the bottom half of the page.
7
All the other created rules will be displayed in the bottom half of the page as well. You may sort them by the Order Disable Rule number, Start Date and Time, End Date and Time, Created By, and Reason, by clicking on the arrow next to the respective column headers.
Key Tip:
While sorting the Order Disable Rule history, if the arrow points downward, the rule history is sorted in descending order by that column, and if it points upward, it is sorted in ascending order by that column. You may toggle between the two orders by clicking on the arrows.
8
You may choose to how many rules you would like to display on the page from the Show field.